

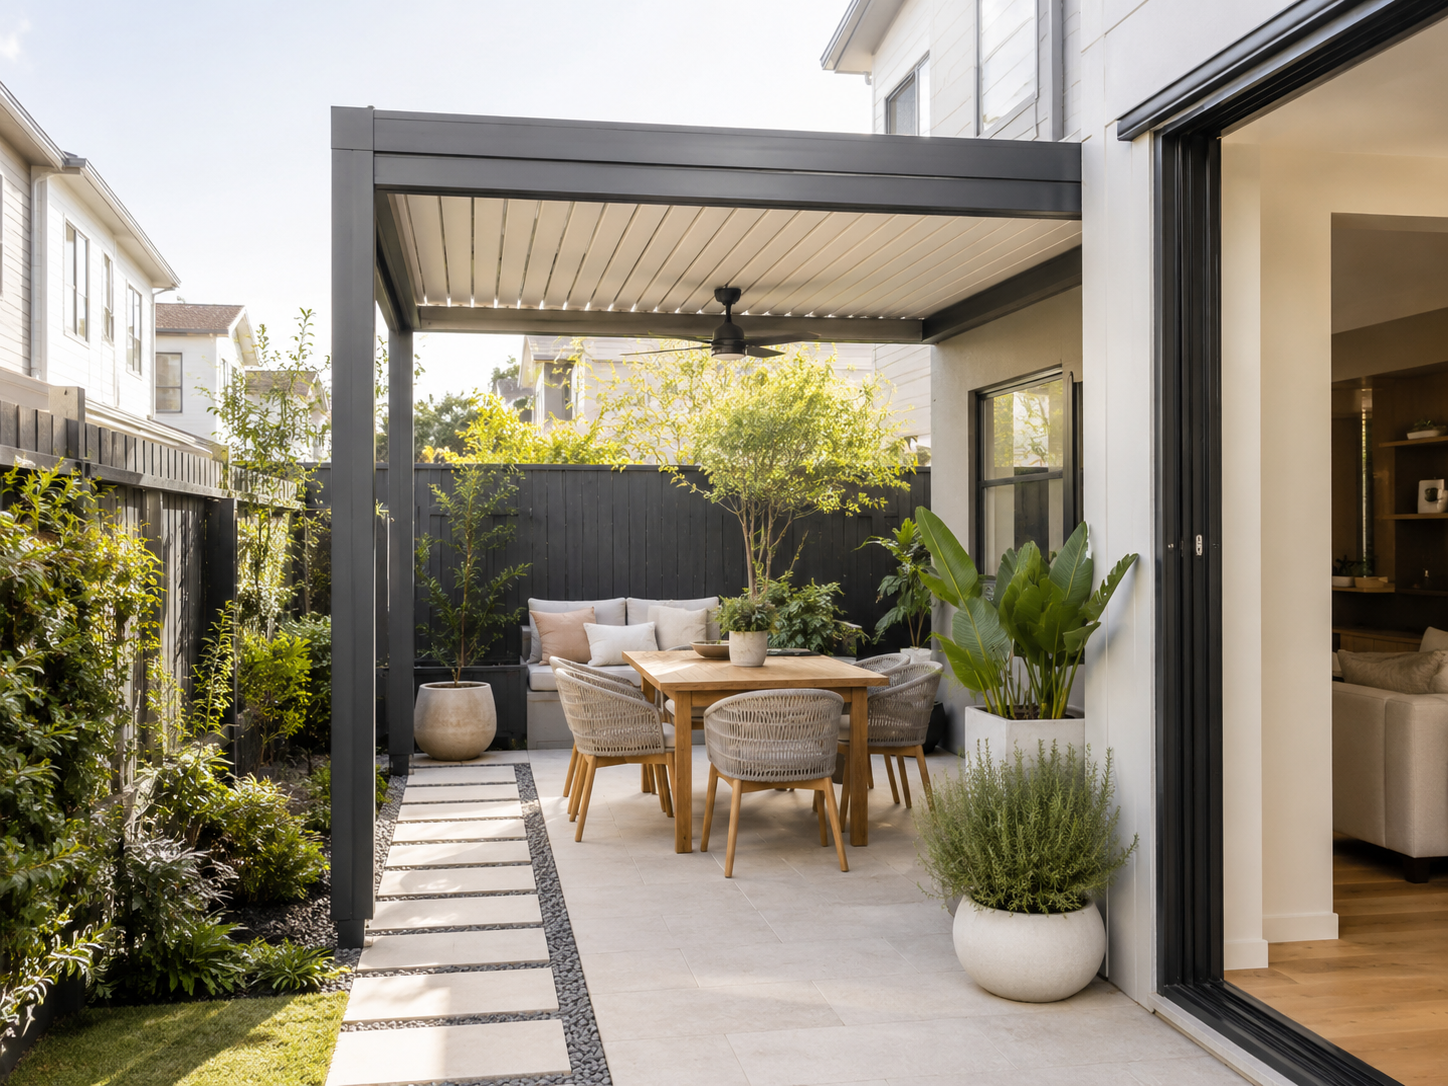
A narrow courtyard often looks spacious when it is empty. Add an open sliding door, a dining table, four chairs, two pots and a route to the garden, and the available floor area changes at once. A successful covered patio for a small backyard starts by measuring that working space, then uses walking paths, furniture movement and daylight to set the roof footprint instead of covering the whole yard.
That order matters in townhouses, compact homes and narrow backyards. A roof can fit neatly between the boundaries and still make everyday movement awkward. The stronger plan usually leaves one edge open, keeps the main route obvious and places shelter above the activity that needs it most.
A useful starting rule
Draw doors, steps, drains, equipment and garden edges before drawing the roof. Place furniture in its normal use position, not its neat storage position. The remaining outline is the area the patio plan must respect.
Plan the space in this order
Measure the Usable Zone, Not the Whole Yard
A small backyard has two different dimensions. One is the full boundary-to-boundary size. The other is the part that can hold posts, seating and movement without blocking a door, step, drain or fixed service. Only the second measurement describes the real planning zone.
Begin at the house wall and record each opening. Mark where a hinged door swings, where a sliding panel stacks and where feet naturally land after stepping outside. Add windows, taps, wall lights, downpipes, vents and outdoor equipment, because a single fixed item near a corner can move an entire post line.
Continue across the paving and garden. Steps need a clear approach, drains need access for cleaning, and planted areas may still need open sky and rain. Gates, bins, clothes-drying areas and side passages also belong on the sketch, even when they sit outside the preferred seating view.
A basic drawing is enough for the early decision. Use a tape measure, graph paper and two wide phone photos. Record the width along the house, the depth on both sides and any change in direction, since compact yards often taper near a fence or utility corner.
Separate fixed obstacles from movable items
Use one mark for elements that cannot move and another for items that could be relocated. A drain, structural wall, gate and external unit belong in the fixed group. A pot, lightweight storage box or loose bench belongs in the flexible group, so it should not control the whole roof position unless it serves an important purpose.
This distinction prevents a common mistake: treating the existing paving as the automatic pergola boundary. Old paving may include a passage, a maintenance strip or an awkward corner that was never intended for seating. The roof should follow the useful outdoor zone, not every edge of concrete.
- Door openings, windows, steps and floor-level changes
- Drains, downpipes, taps, vents and fixed equipment
- Gates, side access, storage and drying routes
- Garden beds and plants that should remain open to light
- The exact area used by furniture when people are seated
Consider a townhouse courtyard with sliding doors on the left, a drain near the centre and a narrow planted strip along the rear fence. Extending the roof to the far boundary may look generous on a plan, yet it covers the plants and makes drain access less convenient. A smaller roof beside the doors can shelter the table while leaving a brighter garden edge beyond it.

Keep Clear Walking Paths in a Narrow Backyard
Most small backyards have one route that matters more than every other line. It may connect the kitchen with the garden gate, the laundry with the drying area, or the living room with a rear shed. That route should remain visible before the table, posts or side accessories are placed.
The most accurate test happens when the path is busy. A laundry basket changes body width. A tray of food reduces the ability to turn. A chair left pulled back after lunch can turn a comfortable-looking gap into a repeated obstacle.
There is no universal passage width for every courtyard. Door direction, furniture shape, mobility needs and frequency of use all change the answer. Temporary markers work better than a copied number: place tape or small boxes where the posts may stand, then walk the real route several times while carrying something bulky.
A simple layout that usually feels easier
The route stays readable even when a chair is pulled back. On a narrow site, this usually works better than centring furniture and splitting the passage into two tight gaps.
Keep movement beside the furniture, not through it
A table centred in a narrow courtyard may look balanced in a photograph, but it often divides the remaining space into two weak passages. Moving the table closer to a quiet wall or garden edge can create one clear route on the active side. The layout may become less symmetrical, yet daily movement feels calmer.
Dining chairs also behave differently from lounge seating. A low chair may stay in one position for weeks, while dining chairs move at every meal. When both functions share a small area, the fixed lounge pieces can occupy the quiet corner and the dining chairs should stay away from the main path.
Door thresholds need extra breathing room. Shoes pause there, hands change grip on trays there, and pets often wait beside the opening. Leaving a small visual pause immediately outside the door makes the entire patio feel less congested, even when the total yard is narrow.
Test the untidy version of the space
Neat furniture gives false confidence. Chairs tucked under a table, cushions stacked away and a closed barbecue lid show storage, not use. Pull the chairs back, open the storage bench and place the watering can near the garden before checking whether the route still works.
A ten-minute rehearsal usually reveals more than another page of measurements. Set the table as it would look during dinner, mark likely posts and walk from the house to every destination in the yard. If the same turn feels awkward twice, treat it as a layout problem rather than something that will become normal later.
The aim is not empty space everywhere. Once the main route is protected, furniture can sit closer together inside the activity zone. A compact patio feels generous when movement is clear, not when every object is pushed against a boundary.
Choose a Roof That Does Not Make a Small Courtyard Feel Dark
Darkness in a small courtyard rarely comes from frame colour alone. Roof depth, nearby windows, tall fences and the amount of visible sky all shape the result. A roof that extends deeply across a living-room window can reduce the sense of daylight indoors even when the outdoor paving still looks bright.
Stand inside the adjoining room before finalising the footprint. Look toward the yard in the morning, near midday and later in the afternoon. The view from the kitchen bench or sofa often reveals whether a beam line feels calm, crosses an important window or visually lowers the ceiling beyond the glass.
Adjustable louvres can help manage changing light and airflow. Open blades can admit more sky during mild conditions, while another position can reduce stronger overhead sun. Their flexibility is useful, but it cannot rescue a roof that is simply too deep for the window relationship.
Let roof depth follow the useful activity zone
The instinct to cover every paved centimetre is understandable. More roof appears to promise more usable space. In a tight yard, though, the final strip may sit above a passage, plant bed or unused corner rather than above the table or chairs.
Removing that unnecessary depth can preserve indoor light and give the yard a visible open edge. A dining setting beside glazed doors may need shelter above the table and active chair sides, while a neighbouring window can remain beside open sky. The patio still feels complete because the roof follows the main use rather than the entire slab.
Finish colour changes visual weight, but it should support the house rather than carry the whole decision. A lighter frame can blend with pale walls and paving. A grey frame can look equally calm beside darker windows, brick or timber when the beams do not crowd the view.
The surfaces below the roof matter as well. Dark paving, dark furniture and a dark overhead frame can create a heavy centre in a small yard. A light tabletop, restrained cushions or one pale outdoor rug can break that effect without filling the area with decoration.
Check side light before adding more roof
Late-afternoon glare often arrives below the roof line rather than through it. A western fence, open side or neighbouring wall may send light directly across the seated position. Increasing roof depth will not solve that angle, so furniture orientation or one targeted side accessory may work better.
A simple phone photo can help with this decision. Take one image from the usual seat when glare is strongest and another from inside the adjoining room. These two views show whether the issue comes from overhead light, side exposure or the relationship between the frame and windows.
This is where a covered patio should remain visually lighter than an enclosed room. Open edges, visible planting and a section of sky keep the yard connected to the outdoors. Closing every side may add shelter, but it can also remove the qualities that make a small courtyard feel open.
Use Furniture Scale to Guide Pergola Size
Furniture is the most honest guide to pergola size because it changes position during normal use. A table may have a compact listed footprint, yet the space expands whenever chairs slide back. A lounge chair may rotate toward the garden, and a small side table may move between seats during the week.
Measure the table at its widest and longest points, including rounded ends or extension leaves. Place every chair around it and pull each one back to the normal sitting position. Armrests, angled legs and deep cushions can make the arrangement occupy more floor area than the catalogue dimensions suggest.
For lounge furniture, measure the full arrangement rather than each piece alone. Two generous chairs and a small table may use less floor space than a compact sofa with a deep coffee table, yet the chairs may need more turning room. Cardboard outlines or painter's tape can show the real relationship before any post position becomes fixed.
Include the operating footprint
Everything tucked away
Chairs sit under the table. Cabinet doors stay closed. The layout looks smaller than it feels during use.
Everything in normal use
Pull chairs back. Open lids and doors. Add the standing position needed to serve, water plants or pass behind a seat.
A barbecue, cabinet or storage bench has two footprints. The closed position shows where it rests. The open lid, door or side shelf shows where it works, and that second outline is the one that matters near posts and walking paths.
Planters have a working footprint too. Leaves spread beyond the pot, and watering needs a place to stand. One or two reachable planted edges usually add more softness than several pots squeezed into leftover corners.
Choose what deserves cover
A small yard may support four functions: passing through, eating, sitting and gardening. The roof does not need to cover all four. The table or main lounge normally deserves the most reliable overhead protection because that is where time is spent, while the garden and passage can remain open.
Picture a narrow courtyard with a four-seat table and a planted strip along the fence. Covering the table and chair movement creates a complete dining zone. Extending the same roof over the plants adds structure but little everyday value, and it may reduce the rain and light reaching the garden.
A quieter lounge layout can work differently. Two chairs may face the garden with a small table between them, while the roof follows the seated zone and leaves the path beside it open. The result feels like a sheltered garden corner rather than a room filling the entire yard.
Delivery access and assembly space also belong in the planning conversation for a pergola kit. Narrow side paths, stairs and shared access can affect how components reach the backyard. Foundations, wall fixing, drainage, electrical work and local approval requirements should be confirmed for the specific property by suitable professionals.
Give the patio one main job
Mixed-use spaces become difficult when every function receives equal priority. A narrow yard cannot usually behave as a full dining room, lounge, garden workshop and storage area at the same time. Naming one main job makes the roof footprint easier to judge and prevents secondary items from taking over the floor.
For a dining-led patio, the table, active chair sides and route from the kitchen deserve attention. A barbecue can sit near the edge if its operating space remains clear, while lounge seating may reduce to a bench or one chair. The result feels intentional because the largest pieces support the same activity.
For a lounge-led patio, low seating and the garden view may matter more than a large table. A small movable surface can handle drinks or a book, and the open route can stay beside the seating. This arrangement often needs less covered floor but benefits from careful shade direction during the time the chairs are normally used.
Occasional needs can stay flexible. Folding chairs, a slim trolley or a lightweight side table can appear for a weekend meal and move away afterwards. Permanent roof size should follow the routine that happens every week, not the largest gathering imagined once or twice a year.
Freestanding or Wall-Mounted in a Tight Space
In a narrow yard, the choice between freestanding and wall-mounted is mainly about posts, wall conditions and the transition from indoors. A wall-mounted layout may keep the house edge visually cleaner. A freestanding structure can avoid relying on a wall that has awkward windows, services, gutters or uncertain fixing conditions.
When wall-mounted supports a cleaner threshold
Wall-mounted often suits an activity zone that begins immediately outside wide doors. The roof reads as an extension of the building, and the absence of posts along the rear edge can keep the threshold more open. That visual continuity is valuable when the courtyard is only a few steps deep.
The house wall still has to cooperate. Cladding, eaves, windows, gutters, downpipes and wall-mounted equipment can interrupt the fixing line or place a beam in an uncomfortable position. A straight-on photograph of the whole wall is more useful than a close image of the paving because it shows these relationships together.
Drainage needs equal attention. Existing downpipes, paving levels and the route for roof water cannot be resolved from a lifestyle image. Site-specific structural and drainage advice should confirm whether the proposed wall connection and water path are suitable.
When freestanding protects a difficult wall
Freestanding can be the cleaner direction when the rear façade is crowded. A downpipe, external unit, wall light and two different window heights may leave no calm attachment line. Moving the structure forward can preserve the house wall and create a separate seating zone in front of it.
The trade-off is the full set of post positions. One front post may sit neatly beside a garden bed while another lands in the main route. Rotating the furniture or shifting the footprint slightly can solve the conflict, and that adjustment is usually better than centring the frame for appearance alone.
A freestanding option may also suit seating placed away from the house. Some compact yards have a sunny or private corner near the rear boundary, while the area beside the door acts mainly as access. A separate roof above the destination keeps the side route open and avoids turning the yard into one long covered passage.
Neither configuration is automatically right for small spaces. The better choice is the one that keeps important openings clear, places posts outside the main movement line and creates a roof relationship that looks settled from inside the home. Structural suitability still needs professional confirmation on site.
Accessories That Solve a Real Small-Space Problem
Accessories should answer a repeated problem at a known time of day. A side blind may help when low afternoon sun crosses the table or when one exposed edge catches regular wind. Integrated lighting may help when dinner continues after sunset and a floor lamp would consume a useful corner.
Adding every available option works against a compact plan. Several screens, heaters, decorative lights, cabinets and large pots can make a tidy structure feel crowded. Start with the issue that most often stops the space from being used, then choose one response.
Use a wind blind on the exposed side
A wind blind makes sense when one side has a clear job to do. It might face low western sun, a nearby property or the direction of a regular breeze. Targeting that edge can improve comfort while the remaining sides stay open to the garden and sky.
Sit in the planned position at the difficult hour before choosing the side. At late afternoon, notice whether glare reaches eye level or only the floor. On a breezy day, watch leaves or a napkin on the table to see whether the exposure is consistent enough to justify a blind.
Privacy deserves the same restraint. A full solid barrier may make a narrow yard feel smaller, while one flexible screen can soften the view when needed. Keep the best garden outlook open and place screening where it protects the seated position rather than enclosing every edge.

Use integrated light to protect floor space
Lighting can quietly take over a small floor plan. A standing lamp needs a stable corner and a safe cable route, while a table lamp removes serving space. Integrated strip lighting keeps the floor clear and places soft light around the structure instead.
The aim is not to make the patio as bright as an indoor kitchen. A dining setting usually needs even light across plates and chair movement. Food preparation, steps or a barbecue may need separate task lighting, and electrical work should follow site-specific professional advice.
The indoor view matters after dark as well. Harsh outdoor light can make a compact patio look like a bright box beyond the glass. Softer lighting keeps the transition calmer and allows planting and the night sky to remain part of the scene.

Accessories that duplicate one another should be removed from the plan. A wind blind, tall hedge and row of large pots may all try to solve the same privacy problem. Choosing the clearest solution leaves more floor area and makes the patio easier to clean and maintain.
Where P120 Fits Into the Decision
Model selection should begin only after the usable zone, furniture and preferred configuration are clear. P120 is the starting Everpergo option worth checking for a compact courtyard because the current product range positions it for patios, balconies and smaller gardens. Its manual louvres and choice of freestanding or wall-mounted layout make it a practical reference point for a simpler outdoor zone.
That does not make P120 the automatic answer for every narrow backyard. A small site can still have difficult wall conditions, awkward post locations or furniture that needs a different structural footprint. The model should fit the plan; the plan should not be distorted to fit the model.
 Compact-space model to checkP120 aluminium pergola for a compact covered patioA useful starting point for a focused dining or lounge zone where manual louvres and a choice of freestanding or wall-mounted placement suit the plan. Doors, windows, posts and furniture still decide the final fit.View P120
Use the daily routine as the filter
Manual operation can suit a compact patio where the louvres change position only occasionally, such as a breakfast corner or dinner area that needs one adjustment as the light moves. If the roof is expected to change repeatedly across cooking, daytime shade and evening use, compare the wider range before choosing; operation method should follow the daily routine rather than a feature list.
Scale follows the same rule. P120 can be a useful starting point when the usable zone is one focused lounge or dining area, but a broader outdoor room should be compared against the next model rather than forcing a smaller option to cover a job it was not selected for.
Recognise when standard sizing is fighting the site
Standard sizing works best when the usable area forms a clear rectangle and the post positions stay outside doors, steps, windows and the main walking line. It becomes less convincing when one post blocks the only route, a roof edge crosses an important window, the paving tapers or fixed services prevent a useful rectangular layout.
In those cases, custom pergola options are worth reviewing for a specific physical reason: moving a post away from a step, protecting a window, following an irregular usable zone or aligning the roof more closely with the furniture. When no such conflict exists, a standard option is usually the simpler path.
What to Prepare Before Choosing
A useful enquiry does not need a finished architectural drawing. It needs the information that shows how a small backyard actually works: usable width and depth, fixed obstacles, furniture in its normal open position and two wide photographs. If the yard tapers, record both sides rather than relying on one overall dimension.
One photo should face the house and include doors, windows, eaves, gutters and downpipes. The second should face the garden or boundary and show gates, planted areas and the main route. Add one time-of-day photo only when glare, shade or privacy is the problem being solved.
Prepare these four items
- Usable width and depth, including any taper or offset
- Door, step, drain, window and equipment positions
- Furniture shown in its normal open or pulled-back position
- Two wide site photos, one toward the house and one toward the yard
Use those four items to decide the next page. Check P120 when the plan describes one focused compact zone. Use the comparison page when the correct scale or roof operation is still uncertain. Move to customisation when a standard post or roof line conflicts with the real site.
A well-planned covered patio for limited backyard space does not try to cover every boundary. It protects the table or main seats, keeps the route clear and leaves enough open edge for light, planting and a sense of depth.
Choose the next page from the site condition
Use the space plan—not the product name—as the filter for the next step.
FAQ
Practical answers for checking a compact patio layout before comparing pergola options.
Share:
Patio Covers for West-Facing Backyards: How to Control Harsh Afternoon Sun
Pergola Kit Delivery Checklist: Access, Storage and Site Preparation Before Arrival