

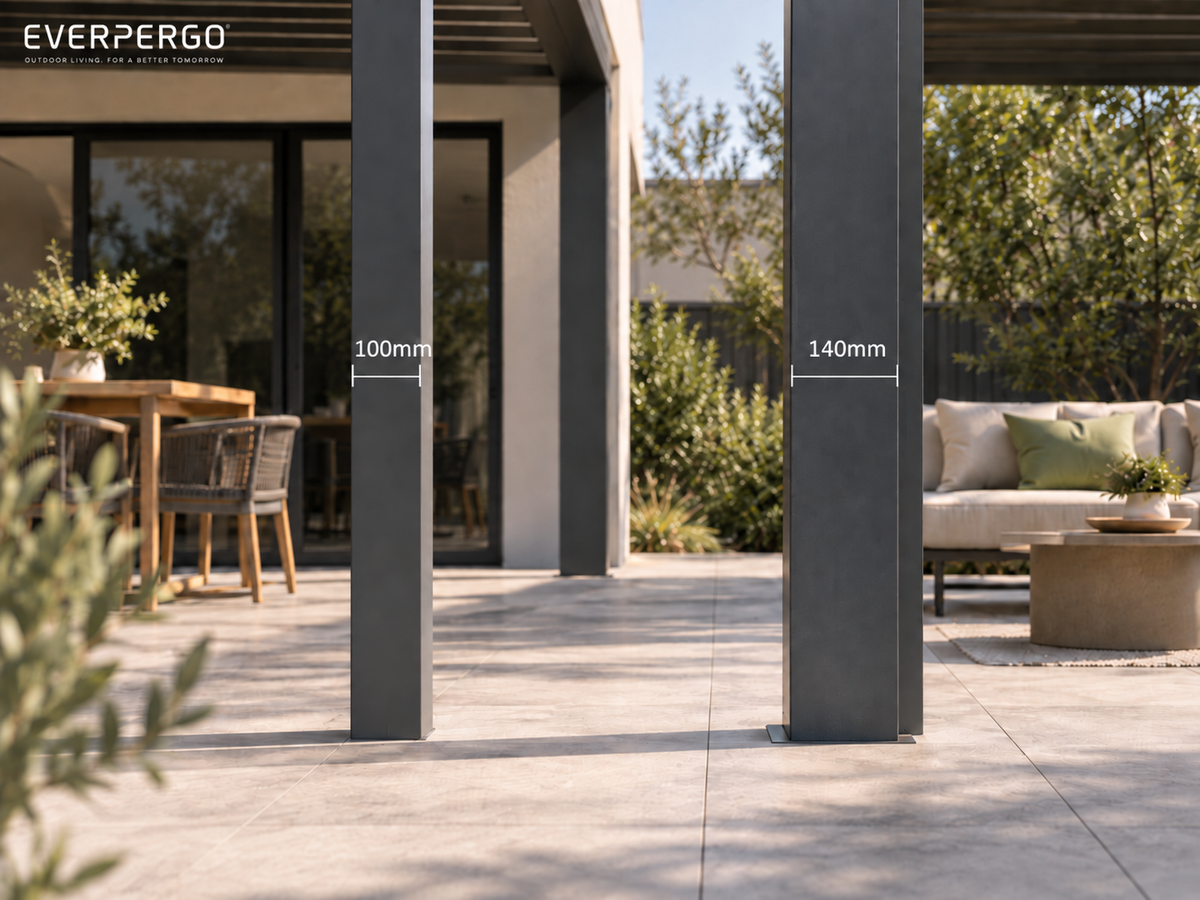
A 100 mm pergola post and a 140 mm pergola post create more than a 40 mm difference on a specification sheet. In a real outdoor space, the wider post has a stronger vertical presence, occupies more of the view at a corner and can feel more substantial beside doors, paving edges or other fixed lines.
For the two systems compared in this guide, P120 uses 100 × 100 mm posts, while P180 uses 140 × 140 mm posts. That comparison is useful for visual proportion and site planning, but post width alone does not tell you the footing size, base plate dimensions, wall thickness or whether a structure is suitable for a particular project.
Quick answer
A 100 mm post usually reads as a slimmer vertical element; a 140 mm post creates a broader, more substantial corner.
A 140 mm face is 40% wider than a 100 mm face. If both posts are centred on the same point, the larger outline extends 20 mm farther on each side. That difference becomes most noticeable beside a doorway, paving edge or important sightline. Compare the complete P120 or P180 frame rather than judging post width as a stand-alone structural specification.
What do 100 mm and 140 mm post sizes refer to?
In this comparison, the numbers describe the outside width of the square aluminium post section. P120 has a 100 × 100 mm post, so each visible face is nominally 100 mm wide. P180 has a 140 × 140 mm post, giving it a visibly broader face from the same viewing angle.
This sounds straightforward, but it is also where homeowners can easily read too much into one number. A post section is only the visible vertical member. It does not automatically describe everything happening at ground level or inside the post.
What the post number does tell you
It gives a reliable reference for the visible width of the upright. That matters when you are imagining a corner beside glazing, a rendered wall, paving joints or a narrow section of garden. It also lets you compare how strongly the post will appear relative to the rest of the pergola.
For visual planning, that is useful information. A 100 mm line marked on the ground and a 140 mm line marked beside it can make the difference much easier to understand than looking at two product specifications on a screen.
What the extra 40 mm means on plan
If a 100 mm and 140 mm post share the same centre point, the larger post extends 20 mm farther on each side. If one outside edge is held in the same position instead, the opposite face moves a full 40 mm farther.
That is why the difference can matter beside a door jamb, step edge, paving joint or narrow passage even when 40 mm sounds small in isolation.
This distinction matters particularly on an existing slab or deck. A homeowner might tape out a 100 mm square and assume that everything required for installation will remain inside that square. That assumption should not be made. Use the post section to judge visual position; confirm the complete installation zone separately.
How posts change the vertical proportions
Post size changes how an aluminium pergola is read vertically. It is not simply a question of one post looking “bigger”. The effect depends on viewing distance, what sits immediately behind the post and how the upright relates to the complete frame above it.
Close up, the extra width becomes easier to notice
Imagine standing just inside a sliding door looking towards one front corner of a pergola. At that distance, the face of the post occupies a real portion of the view. Adding 40 mm to the post width can be visually noticeable because the post is being compared with nearby architectural lines: the door jamb, the edge of a window, a fence post or a narrow strip of wall.
Move farther into the garden and the difference often becomes less dominant. From a longer view, the eye reads the pergola as a complete rectangular structure. The posts become part of the overall rhythm rather than isolated objects. This is why a specification should never be judged only from a close-up product drawing or only from a distant lifestyle photograph.

Judge the post and upper frame together
The post also has to look intentional under the structure it supports. A slim upright can create a lighter visual impression, while a broader upright can make the corners feel more firmly defined. Neither result is automatically better. The relevant question is whether the vertical member and the rest of that particular pergola feel proportionate in the setting.
Beam size is a separate specification and engineering consideration. If you are comparing the depth of the upper frame, see our 120mm vs 180mm pergola beams guide. For this comparison, post width is useful because it changes the visible vertical proportion and the way each corner occupies the site.
Useful viewing test: stand in the room that looks directly onto the pergola, then move outside to the opposite side of the yard. If the post dominates one of those views, check whether the issue is really post width or whether the proposed corner is simply sitting on an awkward visual line.
Why the footprint feels different on site
A pergola post has a small measured footprint compared with the whole outdoor area, yet it can feel surprisingly important because it occupies a fixed point that people repeatedly see and move past. That is why a 40 mm difference can matter more at one corner than it does at another.

Where width becomes noticeable
A corner beside a fixed feature feels different from an open corner
A 140 mm post positioned out in open paving may have generous empty space around it and feel completely natural. Put the same post close to a door jamb, step edge or narrow garden passage and its presence becomes stronger because there is less visual breathing room.
This is one reason post width should be evaluated together with location. Moving a proposed post slightly may sometimes change the perceived footprint more than switching between two post sections.
Sightlines create the same effect. A post near the edge of the view from a living room may barely register. A post sitting directly between the indoor seating position and the main garden view can feel much more prominent even though its physical size is unchanged.
The other practical issue is the relationship between the visible post and the complete installed area. The outside post section should not be treated as a guaranteed clearance envelope. Base plates, anchors, adjacent edges and supporting conditions may require their own space. Those details need to be checked for the actual installation rather than inferred from a 100 mm or 140 mm figure.
Ask what the post sits beside
Instead of asking only “Is 140 mm too wide?”, look at the proposed corner and identify the fixed feature beside it. A glazing edge, garden boundary, step, paving transition or frequently used doorway gives the dimension context. Without that context, the number alone says very little about how the space will feel.
The key issue is whether the vertical element itself feels comfortably located and visually proportionate within the site, without creating unnecessary conflict with an opening, route or important view.
P120 and P180 post sizes side by side
The verified comparison is simple: P120 uses 100 × 100 mm posts and P180 uses 140 × 140 mm posts. The more useful part of the decision is understanding how those two sections behave visually when they belong to two different pergola frames.
They should not be treated as though the same pergola is available with an optional “thin” or “thick” post. P120 and P180 are separate product systems. Compare the complete model and the proposed site position, then use post width as one part of that judgement. For the wider product-level differences, use the P120 and P180 comparison.

P120
100 × 100 mm posts
The narrower square section gives the upright a slimmer visible face. On site, check whether that proportion sits comfortably against the nearby architecture and whether the proposed corner remains visually clear from the main approach.
Explore P120
P180
140 × 140 mm posts
The broader square section gives each corner more visual mass. Check it as part of the complete P180 frame and pay particular attention when a proposed post sits close to a fixed architectural edge or a strong view from indoors.
Explore P180Do not turn post width into a structural ranking
A 140 mm post should not be described as automatically safer or more suitable simply because it is wider. Structural suitability depends on the complete frame, connections, supporting conditions and project requirements. The 100 mm versus 140 mm comparison in this guide is about verified section size, visual proportion and site presence.
That distinction also helps avoid an unnecessary “bigger must be better” decision. A homeowner with a compact outdoor space may prefer how the P120 vertical proportion sits against the home. Another project may look more balanced with the broader P180 post. Those are legitimate spatial observations, but they are not substitutes for checking the complete product and project requirements.
If the choice is close, do not decide from product photos alone. Product photography gives useful context, but camera position, lens perspective and background scale can all change how thick a post appears. A full-size mark on the actual site is the more reliable visual test.
Check the post location at full scale
The quickest way to understand 100mm vs 140mm pergola posts is to stop imagining them as numbers and draw them at their real size. Masking tape, painter’s tape or removable chalk is enough for an initial check on most suitable surfaces.
Mark the proposed post position first, not an arbitrary square in the middle of the patio. The value of the test comes from seeing the dimension beside the real door, wall, paving edge and view that will remain after installation.
Mark the 100 × 100 mm square
Put the first outline exactly where the P120 post would stand. Mark all four edges, not just the centre point. This makes the visible face and corner position easier to judge.
Overlay the 140 × 140 mm outline
Add the larger P180 outline using another tape colour if available. If the centre point remains the same, the 140 mm outline extends 20 mm farther on each side. If the design holds one outside edge in place, compare the full 40 mm increase on the opposite side.
Walk the normal route
Enter from the main door, turn towards the garden and approach the post from both directions. The aim is not to calculate a universal clearance number; it is to notice whether the proposed corner feels awkward in the way the area is actually used.
Check the view from inside
Stand at the main indoor viewing point and look through the doorway or glazing towards the marked corner. This often reveals visual conflicts that are not obvious while standing directly beside the tape.
Use photos to compare locations, not just products
Once both outlines are marked, take a photo from the house looking outward and another from the outdoor area looking back. If one location appears crowded, test whether shifting the proposed post alignment improves the result before assuming that the post section itself is the problem.
For a freestanding pergola, repeat the exercise at every supporting corner that affects a door, common route or important sightline. One corner may have plenty of room while another is much more sensitive. A single “the patio is large enough” judgement can miss that difference.
What this test can answer
It can show whether the visible post size and position feel proportionate in the real space. It cannot confirm footing design, base plate requirements, anchor arrangement or structural suitability. Keep those as separate checks.
The goal is not to make every post visually disappear. Posts are part of the architecture of the pergola. A successful position is one that looks intentional, works with the main lines of the home and does not create unnecessary friction around an existing opening or common movement line.
Compare the complete systems
Review the models with your marked post positions beside you
P120 and P180 use different post sections and should be assessed as complete pergola systems. Once you have marked the proposed corners, compare the overall frame, available configurations and product specifications rather than choosing from post width alone.
100mm vs 140mm pergola posts: FAQs
Is post width the same as the footing or base plate size?
No. The 100 × 100 mm or 140 × 140 mm figure describes the outside post section. Footing size, base plate dimensions, anchors and supporting conditions are separate installation details and need to be confirmed for the actual project.
Can I judge structural suitability from post width alone?
No. Post width is only one visible specification within a complete pergola system. Structural suitability depends on the complete frame, connections, site conditions and supporting structure. Do not use the 100 mm versus 140 mm comparison as a stand-alone safety test.
Before choosing the frame
Compare the post where it will actually stand
Before comparing models, record the proposed pergola width and depth, whether the layout is freestanding or wall-mounted, and the location of doors, glazing, steps, drains, boundaries or other fixed features close to each post.
Mark the proposed corners at full scale and take one photo looking from the house towards the pergola area and another looking back towards the home. Then review P120 and P180 as complete systems with those real site constraints in mind.
Share:
What Does a 170mm Pergola Louvre Mean for Roof Design and Appearance?