

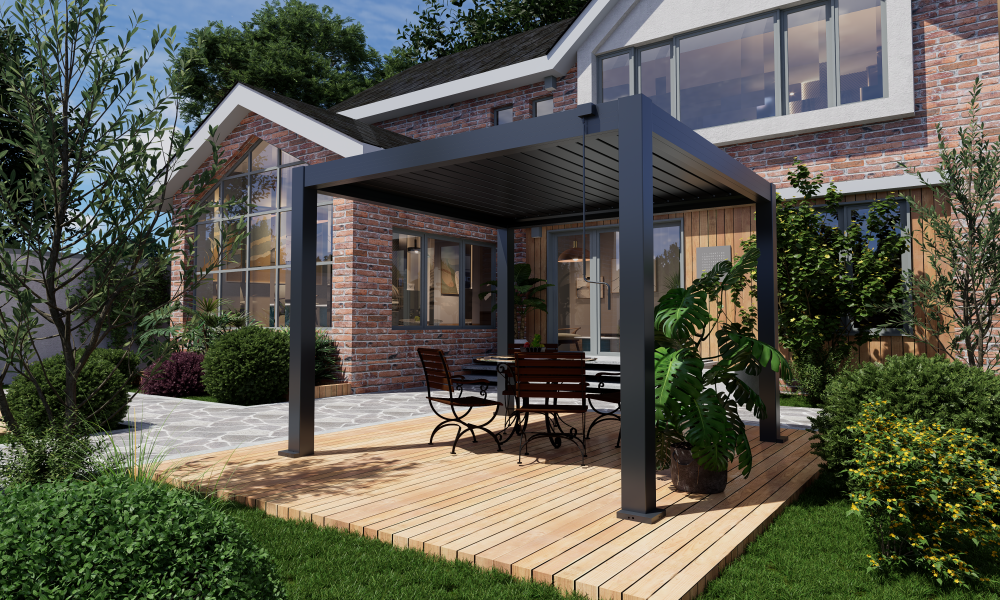
A pergola attached to house can feel effortless when it is done well. It can also end up feeling too dark, too exposed, too bulky, or simply less useful than people imagined. Before choosing a size or style, it helps to understand how the space is actually used day to day, what makes it uncomfortable now, and what would make it feel genuinely better to live with.
- Why an attached pergola often feels more useful than a freestanding one
- Tip 1: Start with the wall, not the finish
- Tip 2: Read the roof edge and eaves before choosing projection
- Tip 3: Follow the water path before choosing the footprint
- Tip 4: Read the sun before reading the spec sheet
- Tip 5: Doors, windows, and daily movement matter more than most people expect
- Tip 6: A better outdoor room is built through layers, not just roof coverage
- Tip 7: Think about evening use before the project is finished
- How to use the space well after installation
- Common mistakes people only notice later
- FAQ
A pergola attached to house usually enters the conversation for a very human reason. The patio outside the back door looks good, but it is not comfortable enough to use the way people hoped. The morning sun may be lovely, but the afternoon glare is too strong. The outdoor dining setting may work in perfect weather, but not when the wind picks up. The space may technically be there, yet still not feel like a place the household settles into naturally.
That gap between having outdoor space and actually enjoying it is where attached pergolas make sense. When they are planned well, they do more than add cover. They soften the edge of the house. They make the step outside feel easier. They turn an underused patio into somewhere you reach for more often without having to think about it.
This is also why a good attached pergola rarely starts with features. It starts with observation. What time of day do people want to sit outside? Which direction does the uncomfortable sun come from? Where do people walk in and out most often? When does the area feel inviting, and when does it quietly fail? Those are the questions that lead to a better outcome.
If you are planning a pergola attached to house, the useful goal is not simply to cover the biggest area possible. It is to create an outdoor space that feels calmer, more usable, and more connected to everyday life. That often comes down to judgment rather than sheer size: reading light properly, understanding movement, noticing edge conditions, and choosing the kind of protection that suits the way the household actually lives.
The guide below is written from that point of view. It is for readers who want something practical, grounded, and realistic rather than a list of sales points. If the patio already exists and you want to make it genuinely better, this is where to begin.
Why an attached pergola often feels more useful than a freestanding one
An attached pergola tends to feel useful faster because it sits where life already happens. It is near the kitchen, near the living room, near the stacker doors, near the shortcut everyone already takes to step outside for fresh air, check the weather, bring plates out, or call the dog in. That closeness matters more than people expect.
Freestanding pergolas can be beautiful, especially in larger backyards where the goal is to create a separate destination. But for many homes, especially suburban homes where the main outdoor area is directly beside the house, the attached format is more naturally lived in. It does not ask people to go somewhere else. It simply makes the edge of the home work better.
There is also a subtle emotional advantage to that. When the pergola is attached well, the back of the house often feels calmer and more finished. The home seems to open outward more gracefully. The patio stops feeling like a leftover hard surface and starts to feel like a room with more air around it.
 Shop this product
That said, attached does not automatically mean right. If the wall connection is awkward, if the patio is shallow, or if the biggest comfort issue actually sits further out in the yard, another approach might suit better. But when the main problem is that the everyday outdoor threshold feels too exposed, too hot, too empty, or too rarely used, the attached pergola is often the answer that fits real life most naturally.
One useful way to think about it is this: a freestanding pergola often creates a place to go, while an attached pergola often improves the place you already go. For many households, that difference is exactly why attached layouts get used more consistently across the week.
If the goal is not just to make the backyard look better, but to make the home feel better to live in, that distinction matters.
Back to top ↑Tip 1: Start with the wall, not the finish
It is easy to begin with the image of the finished space. The outdoor dining set. The clean frame. The softer light. The feeling of finally using the patio properly. But a pergola attached to house starts in a much less glamorous place: the wall itself.
The wall determines whether the entire idea feels clean, believable, and settled once built. A wall may look perfect from a distance and still hide every practical complication that will shape the final outcome. The downpipe may cut through the calmest line. The eaves may leave less room than expected. The window head may interrupt the exact zone where the pergola wants to connect. A neat-looking elevation can still be a difficult one.
One of the best judgment habits is to stand fairly close to the house and look only at the upper portion of the wall for a full minute or two. Ignore the paving. Ignore the furniture. Ignore the rest of the yard. Just study the connection zone. Look at soffits, gutters, downpipes, lights, vents, cladding changes, brick lines, window corners, and how all of those elements visually stack together.
That small pause often reveals more than measurements alone. Some walls instantly feel calm and cooperative. Others feel visually busy before anything has even been attached. That does not mean the project should not happen, only that a busy wall generally needs a more disciplined design response.
Another useful test is to imagine the pergola removed a few years later and ask whether the house elevation would still make visual sense. If the answer is yes, you are probably working with a good host wall. If the answer is no because the pergola seems to be compensating for awkwardness rather than complementing the home, that is worth noticing early.
The right way to think about the wall is not only structural. It is architectural and emotional too. This is the line where the house meets the outdoor room. If that line feels calm, the whole pergola has a chance to feel like it belongs there. If it feels forced, no amount of styling later fully fixes it.
That is why it is so often smarter to begin with the wall, not the finishes. The colour and accessories matter later. The attachment point shapes everything first.
Back to top ↑Tip 2: Read the roof edge and eaves before choosing projection
Projection is one of those decisions people often treat as a number, when in real life it behaves more like a proportion. It changes how the house feels from the yard, how the yard feels from inside, and how much of the patio becomes truly usable rather than technically covered.
This is where the roof edge matters enormously. A pergola does not sit in isolation. It sits under, beside, or visually against the existing house roof and eaves. When those lines cooperate, the result can feel elegant and natural. When they do not, the pergola may still function, but it can look heavy, awkward, or a little too obviously added on later.
 Shop this product
One of the easiest mistakes is choosing a projection that sounds generous but does not feel balanced. Too shallow, and the pergola may not meaningfully improve comfort. Too deep, and the patio can feel heavier or darker than expected, especially on smaller homes or compact rear elevations. The ideal depth is usually the one that solves the actual comfort problem without making the architecture feel overruled by the structure.
A strong way to judge this is from the side rather than only from the front. Stand where you can see the house and patio in profile. Imagine the pergola front beam as a long, clear line extending out. Does it feel settled under the eaves? Does it seem too timid to really help? Does it push so far out that it starts to dominate the rear of the house?
In smaller patios, this becomes even more sensitive. Every extra bit of projection changes not only shade but also mood. A slightly oversized pergola can reduce the sense of openness people loved about the yard. A slightly shallower one can preserve light and still create exactly the right amount of protection where the dining table sits. That is why “bigger must be better” is often the wrong instinct.
It can also help to mark the likely front edge physically before making a final decision. A line of tape, a garden hose, or even a temporary object laid across the paving can give the eye something real to respond to. Once you can see the depth in context, the right answer often becomes much easier to feel.
Good pergola planning is often less about finding the maximum size and more about finding the most believable, most useful proportion. That is exactly what the roof edge and eaves help reveal.
Back to top ↑Tip 3: Follow the water path before choosing the footprint
A pergola can look excellent in dry weather and still feel annoying every time it rains. That usually happens because people paid attention to shelter but not to the way water actually behaves in the space.
On an attached patio, water is never just a practical detail. It shapes whether the threshold feels comfortable, whether chairs can stay where you want them, whether the paving remains pleasant to walk across, and whether the area near the back door feels like part of the living space or like an edge you have to work around carefully.
The best approach here is observational rather than theoretical. Watch the patio during rain if you can. If not, go out soon after. See where puddles form. Notice which corner dries last. Check whether moisture tends to collect near the main doorway. Pay attention to the areas people naturally avoid. These are the kinds of truths that drawings often miss.
Water also affects how relaxed a space feels. Even when the main sitting area is technically dry, damp edges and awkward runoff can make the whole patio feel less settled. People pull furniture inward. They stop using one corner. The outdoor zone shrinks without anybody explicitly deciding it should.
This is one reason custom fit matters more in real projects than people sometimes expect. A standard footprint might look fine on paper but feel slightly wrong on site if it pushes the main seating zone into the part of the patio that is most exposed to lingering dampness or awkward drainage.
If you want a patio that feels easy in mixed weather, not just on perfect days, following the water path early is one of the smartest decisions you can make. It helps the pergola work with the site rather than just sit over it.
A good attached outdoor space does not merely look sheltered. It behaves well when the weather changes. That difference is what people end up appreciating most over time.
Back to top ↑Tip 4: Read the sun before reading the spec sheet
Most people do not regret adding shade. What they regret is solving the wrong light problem.
One patio may feel uncomfortable because of harsh midday overhead sun. Another may actually be fine at noon but miserable from 4 pm onward because of low western glare. Another may be bright in a beautiful way, yet still need just enough cover to make lunch outdoors more realistic in summer. Each of those situations asks for a slightly different response.
That is why it helps to spend time with the light before getting too focused on product details. Go outside when you really use the area or wish you could use it. Morning. Midday. Late afternoon. Stand where the dining table would go. Stand where someone might sit with coffee. Then go inside and look out from the living room. What feels pleasant? What feels tiring? What feels bright but still comfortable, and what feels like it needs correction?
Once you answer that honestly, your planning becomes much clearer. If the biggest issue is low side sun, then overhead cover alone may not solve the problem. If the issue is glare bouncing off pale paving into the room, the answer may partly involve how the outdoor area is layered rather than simply how large the roof is. If the patio gets beautiful winter light that you do not want to lose entirely, the balance becomes more nuanced again.
There is also an emotional side to light that should not be ignored. A good outdoor area should not only be protected. It should feel inviting. It should have light that makes people want to stay a little longer. It should allow the house behind it to feel connected to the outdoors rather than cut off from it.
That is one reason attached pergolas need to be judged from inside as much as outside. You are not only shaping the patio. You are shaping the experience of the adjacent room and the view through its doors and windows every day.
The patio usually tells the truth if you pay attention. A single sunny afternoon of real observation often teaches more than a long product comparison ever could.
Back to top ↑Tip 5: Doors, windows, and daily movement matter more than most people expect
One of the most common planning mistakes is imagining the patio only as a furniture layout. In real life, the area directly outside the house is not just where chairs go. It is a movement zone. It is where people pass through with plates, bags, shoes, pets, children, drinks, groceries, and half-finished tasks.
That means a good pergola attached to house should make the first few steps outside feel easier, not more crowded. If the dining setting ends up blocking natural movement, the space often feels more formal and less usable than expected. If the main door opens into a cramped arrangement, the whole outdoor area can start feeling like something people need to navigate rather than naturally enjoy.
A helpful way to plan is to picture a completely ordinary weekday rather than a styled weekend lunch. Someone opens the door with coffee. Someone else comes through with laundry. A child runs out barefoot. A delivery arrives. The dog goes in and out. These unremarkable moments are what determine whether the pergola supports real life.
Windows matter too, and not only because of aesthetics. They shape the view from indoors, the amount of daylight that reaches the room behind the pergola, and the overall sense of openness. A pergola can look impressive from outside while still making the interior feel flatter if the relationship to the glazing is not handled well.
- Keep the main path from door to patio clear enough for daily use.
- Do not assume the centre of the space is automatically the best place for the dining setting.
- Think about the pergola from inside the house as carefully as you think about it from the yard.
- Remember that a beautiful layout can still feel inconvenient if circulation is awkward.
This is also where attached pergolas either feel truly integrated or slightly staged. If movement remains simple and intuitive, the outdoor area becomes part of everyday life. If movement feels blocked or overly choreographed, the space may still look good but gets used less naturally.
The most successful layouts usually protect a clear strip near the house for movement, place the main sitting zone where comfort is best rather than where symmetry alone suggests it should be, and leave enough openness that stepping outside never feels like entering a tightly arranged set.
In other words, a good attached pergola is not just a cover overhead. It is a better transition between indoor life and outdoor life.
Back to top ↑Tip 6: A better outdoor room is built through layers, not just roof coverage
When people first think about a pergola, they usually think about the roof. But a comfortable outdoor area often depends just as much on what happens at the sides as what happens above.
That is because discomfort rarely comes from one direction only. The patio may need overhead control for heat, side protection for wind, or a more enclosed feeling for cooler months and greater privacy. The outdoor spaces that feel best over time are usually the ones where these needs have been understood clearly and answered in a measured way.
 Shop this product
This is why accessories should not be treated as automatic add-ons. They are best understood as responses to specific discomforts. If the outdoor area already feels lovely but just too exposed on one side, side blinds may do far more than making the pergola larger ever would. If the goal is to create a quieter, more room-like atmosphere during cooler seasons, glass can transform the experience more meaningfully than another metre of projection.
The important shift is this: instead of asking “What else can I add?” ask “What specific feeling is missing from this space right now?” Is it calm? Shelter? Privacy? Softer light? Better late-afternoon comfort? Longer seasonal use? Once that answer is clear, the right layer tends to become obvious.
Frameless glass is a good example. It does not just enclose. It changes mood. It can make the patio feel quieter, more settled, and more like a place to stay. Side blinds work differently. They often solve a single persistent discomfort with surprising effectiveness. Lighting layers do something else again, shifting the patio from a daytime zone into a true evening space.
What matters is that the layers are chosen thoughtfully. When they are, the pergola does not just cover the patio. It tunes the whole outdoor environment in a way that feels more natural to live with.
That is when an attached pergola starts to feel like an outdoor room in the best sense: open enough to stay connected to the garden, but protected enough to feel intentional and easy.
Back to top ↑Tip 7: Think about evening use before the project is finished
A surprising number of pergola decisions are made in daylight, then judged at night. That is often where the difference between “looks good” and “gets used often” really shows up.
Evening use has its own logic. The temperature is different, the pace is different, and what people want from the patio shifts. The space may no longer be about protection from harsh sun. It may be about softness, atmosphere, and comfort. If the lighting feels too harsh, the area becomes less relaxing. If it feels too dim, it becomes decorative rather than usable. If the whole setup lacks warmth, people quietly return inside earlier than they expected.
 Shop this product
This is why it helps to picture a very ordinary evening. Dinner has finished but nobody wants to go inside yet. The air is cooler. The doors are open. Someone is leaning back with a drink. Someone else is still at the table talking. What kind of light would make that moment feel good? Bright enough to be practical, but soft enough to feel inviting. That balance matters enormously.
Integrated lighting tends to work well because it makes the pergola feel complete from the beginning rather than requiring the household to patch the atmosphere later with separate lamps or awkward temporary solutions. More importantly, it changes behaviour. People stay longer. The patio becomes part of the evening routine instead of a space that visually disappears once the sun goes down.
This is also where attached pergolas have a natural advantage over many more distant outdoor structures. Because they sit right beside the home, evening use feels easy. Plates do not need to travel far. Conversation moves through the open doorway naturally. The whole outdoor area feels less like a destination and more like a continuation of home life.
If you want the pergola to matter in more than just bright midday weather, thinking about evening comfort early is one of the smartest decisions you can make.
Back to top ↑Planning an attached pergola for real daily use?
Start by comparing how the space feels now, then match the pergola, accessories, and layout to the actual comfort problems you want to solve.
How to use the space well after installation
Once the pergola is in place, the next step is not just admiring it. It is learning how to let the space work properly. That usually comes down to arrangement, rhythm, and a few smart habits rather than anything complicated.
The first is to keep the threshold clear. The area nearest the house is often the most important strip of the whole patio because it carries everyday movement. If that zone stays open enough to walk through easily, the patio will feel more welcoming and more flexible from the start.
The second is to place furniture where comfort is actually best, not where symmetry alone suggests it should go. If one side holds shade more reliably in the afternoon, that may be the better place for the dining table. If one corner feels calmest in the evening, that may be where a lounge chair belongs.
The third is to let the outdoor area have more than one mode. A good attached pergola should be able to handle quick solo moments as well as shared ones. Morning coffee. An hour with a laptop. Family dinner. A late-night conversation after the weather cools. The more naturally the space supports those shifts, the more it becomes part of the home rather than just an addition to it.
It can also help to resist overfilling the area. People often imagine that more furniture makes a pergola feel more complete. In reality, a little breathing room usually makes an attached outdoor area feel more generous, easier to move through, and more likely to be used in spontaneous ways.
The households that get the most from their pergola are often the ones that stop treating it as a formal entertaining set and start treating it as part of daily life. That shift is small, but it changes everything.
Back to top ↑Common mistakes people only notice later
Some pergola regrets do not appear at the planning stage. They show up weeks later, once the novelty fades and the space settles into ordinary life. Knowing those patterns early can save a lot of frustration.
Making the pergola too big for the way the patio is actually used
Bigger can sound safer, but it can also make the rear of the house feel heavier and darker than expected. The right size is usually the one that improves the way the patio functions without overwhelming the home around it.
Solving overhead shade but ignoring side discomfort
A pergola may cover the patio beautifully and still leave it exposed to low sun, wind, or lack of privacy from one edge. If the real problem comes from the side, the solution may need to as well.
Forgetting the view from inside
Because the pergola is attached to the house, it becomes part of daily indoor life too. If it is only judged from outside, the room behind it can end up feeling flatter, more crowded, or less bright than expected.
Blocking natural movement with furniture
A beautifully styled patio can still feel inconvenient if the route in and out becomes awkward. Ease of movement is one of the most important parts of everyday comfort.
Leaving evening comfort until last
Once people start spending time outside after sunset, lighting and atmosphere matter far more than they expected during the planning stage. This is often one of the details people value most once the pergola is being used regularly.
Treating the pergola as a statement piece instead of a lifestyle space
The outdoor areas that age best are the ones that support ordinary life. If the pergola only works for special occasions, it often ends up admired more than used.
Back to top ↑Final thought
A pergola attached to house works best when it begins with quiet, realistic questions rather than flashy ones. What time of day does the patio fail? Where does the wind come from? What happens when it rains? Does the room behind the doors still feel good? Can people move in and out naturally?
Those questions may not feel glamorous, but they are exactly what lead to a space that feels good to live with. When they are answered well, the finished pergola does more than look polished. It gives the home a softer edge, a calmer outdoor rhythm, and more small moments of daily use that actually matter.
That is the real value of planning carefully. Not just a better-looking patio, but a space that people reach for more often, stay in longer, and quietly come to rely on.
Further reading
Keep readers moving deeper into the site with practical next-step pages around models, sizing, and accessories.
Compare Pergola Models
Help readers understand which pergola family is better suited to a smaller patio, a mid-sized entertaining area, or a larger outdoor setup.
Read more →Customise Your Pergola
A strong next click for readers who have moved past inspiration and want to explore sizing, configuration, and project fit.
Read more →Explore Accessories
Useful for readers who realise their patio comfort issues may involve side protection, enclosure, or lighting rather than roof coverage alone.
Read more →FAQ: Pergola Attached to House
Common questions readers ask when they are still comparing layouts, comfort options, and how an attached pergola will actually feel in daily life.
Is a pergola attached to house better than a freestanding pergola?
It depends on what you want the space to do. If the aim is to improve the patio directly outside the living area, kitchen, or back doors, an attached pergola often feels more natural and more useful in everyday life. If the goal is to create a separate destination deeper in the garden, a freestanding pergola may suit better.
How do I know if my patio needs side protection as well as overhead cover?
Watch the area at the times you most want to use it. If the main discomfort comes from low sun, glare, wind, or lack of privacy from one side, overhead cover alone may not solve the real problem. That is when side blinds or other layered solutions become more relevant.
Will an attached pergola make the room inside darker?
It can, depending on projection, orientation, glazing, and how much of the opening it visually covers. That is why it is important to judge the design from inside the home as well as outside. The best attached pergolas improve comfort without making the interior feel unnecessarily flat or closed in.
What is the biggest planning mistake people make?
Many people choose size or features too early. The stronger approach is to first understand the wall, the roof edge, the direction of sun, the water path, and how the household actually moves through the patio. Once those are clear, product decisions become much easier.
How can I make the space feel more useful after sunset?
Think about function and atmosphere together. The area needs enough light to eat, move around, and stay outside comfortably, but it should still feel soft and inviting rather than harshly lit. Integrated lighting often works well because it helps the pergola feel like a complete evening space from the beginning.
Should I choose the biggest pergola size that fits?
Not always. Bigger can sometimes reduce light, crowd the rear of the house, or make the patio feel heavier than expected. The better choice is usually the size that improves comfort where people actually sit and move, while still keeping the house and outdoor area balanced.
Which page should I look at next if I am still comparing options?
A good next step is to compare pergola models, review custom sizing options, and look at accessories that match the actual comfort issues your patio has now. That usually gives a much clearer direction than browsing only by appearance.
Share:
Freestanding Pergola or Attached Pergola: Which Should You Choose?
Pergola on Deck: What to Check Before Installation